Pageviews

Tuesday, July 31, 2012

Cupcake Experiments

During the month of June, I had a couple of occasions to try out cupcake decoration techniques, with mixed results. For a first timer, who is still pretty new to all this - I think I did ok, but it also shows that just because someone can make it look easy on YouTube, doesn't meant you'll be able to get it right the first time! (or maybe you will - I'm more the ''practice makes edible'' type, it seems)

From various projects I'd given a go in the last weeks, I still had cupcakes in the freezer that were perfect for taking out a few at at time to try decorating techniques on.

I'll sort out the shopping lists per project - these are for cupcakes with piped sunflowers out of Oreo centers and fondant pinwheels and tulips on orange frosted choclate cupcakes.

When one of Kev's teachers had a birthday and celebrated it at school with the class, I thought this was the perfect chance to give a sunflower cupcake a try that I'd pinned (and pinned) on Pinterest.

For just the sunflower project printable version, click here
Sunflower Cupcakes Shopping List:
  • Buttercream recipe - I really recommend using baker's powder sugar and buttercream mix to get a smooth and tasty buttercream that you can color, swirl and pipe in a bag. This base recipe also gives a rich and creamy base flavor. If you like, you can flavor the buttercream any number of ways, but I left it as is for this creation.
  • leaf / petal tip  (wilton 352)
  • (disposable) piping bag
  • Wilton (or Americolor) gel colors in shades of Golden Yellow and Orange
  • Oreo cookies
Because of the Oreo cookies on chocolate cupcakes, I kept the buttercream flavor neutral. You can always add flavor, but it seemed like overkill on this project.

If you google ''sunflower cupcakes'' you'll see any number of variations on this project. My goal was to have a realistic single color petal (also meant less work than two colors in one piping bag) surrounding the Oreo cookie.

Decorating Step by Step:
  • I mixed the golden yellow and orange food colors in my (ivory) buttercream basis until I had a color that held up pretty well alongside some cut sunflowers I had in the house. You can do side by side colors in orange and yellow if you prefer. I wanted one even color so I could focus on the piping technique.
  • Fill your piping bag about 2/3 full with the buttercream and the leaf tip attached.
  • Place an Oreo cookie on the center of the cupcake using some buttercream as ''glue''.
  • The leaf tip is like an inverted triangle, hold it at a 90 degree angle (so the points are on each side of the Oreo cookie) and pipe some buttercream against the Oreo cookie. when the buttercream is adhering to the Oreo,  pull the tip away at a slight angle from the Oreo to get the ''petal'' shape.
  • Repeat in a clockwise direction, with slightly less than a tip space between each petal. Once the bottom layer is complete, begin the second round, filling the spaces from the first layer. these will overlap slightly, so that the petal effect is realistic. Depending on the thickness of the Oreo, finish off with a third round.

This technique uses a fair amount of buttercream, and gives one big sunflower per cupcake. My piping bag was pretty well empty after these two (three petal layer each) cupcakes. I've seen (and want to try next) variations using mini oreos on top of a swirl of buttercream for more petite sunflowers.

For the Fondant Pinwheels and Tulips printable version, click here
Dutch Supporter Cakes Shopping List:
  • Wilton (or Americolor) gel color in Orange
  • (disposable) piping bag
  • 1M tip (open star)
  • large coupler (coupler is optional)
  • Fondant in Red and Blue (pre colored) or color your own with gel colors
  • Fondant punch set (stamps)
  • small knife or straight edge cutting tool
  • rolling pin
  • silicon mat
  • middle size square cut out
  • Red, white and blue sprinkles
For this section, I'm going to focus on creating the two types of decorations - the pinwheels and tulip stamps. for basic buttercream swirling technique, I really recommend checking out the blog post and tutorial that Glory has created at her blog, Glorious Treats. She explains the basic techniques (and shows them!) way better than I ever could.

Since I already had the cupcakes and buttercream on hand, I started here with coloring the buttercream.

Decorating Step by Step:
  • Using the orange color gel and a toothpick, add coloring until you have the desired shade and intensity. I went more for an orange sherbet color than full on Halloween orange - it's up to you!
  • Place the colored butter cream into a prepared piping bag already fitted with a coupler (if you're going to use one)
  • Add the 1M tip and the outside part of coupler and squeeze until the buttercream begins to come out without any air bubbles
  • Pipe the buttercream starting from the outside inwards in slightly overlapping circles until you reach the center then lift up
  • Add sprinkles and your choice of fondant decoration as a topper.
    • Pinwheels Step by Step
      • Roll out two equal amount of blue and red fondant slightly thicker than the desired final thickness
      • Place the two colors of fondant on top of each other and roll them out together to desired thickness
      • Using the middle sized square cutter, cut out the basic pinwheel shape
      • From the middle point of each square, leave some space around and cut a diagonal line, about 2/3 out to each corner, creating four slanted cuts that leave the center space free
      • Starting with one corner, fold it to the center, creating a triangle. Going counter-clockwise,  fold down the next corner. Repeat until all four corners are folded towards the center. As you do this, the color on the bottom will come up, giving you two-tone pinwheels.
      • Create a little circle of fondant in one of the colors and flatten it on top of the pinwheel to create the pin holding everything in place.
2 colored Pinwheels and Tulip Stamps
If my directions for the pinwheels don't make this easier and you get stuck (or you're a visual person) you should check out the step by step with pics over at A Baked Creation. It's been amazingly outlined there, and it really is easy to do!
    • Tulip Stamps Step by Step
      • roll out both red and blue fondant to approx 1 1/2 inch width and similar thickness to the pinwheels above create rectangular ''ribbons'' using either a edging tool or a ruler and straight edge tool
      • using the stamp tool with the thick tulip stamp, stamp the fondant with enough pressure to leave a full imprint, but not enough to ''punch'' the design out. It should leave a clear impression in the fondant but not break through anywhere
      • repeat the design along the full ribbon, leaving a equal distance between designs (at least to the eye)
      • repeat the process with the second color and then cut out rectangular shapes using the blunt edge of a knife or edge tool
      • Apply two shapes (one in each color) to your cupcakes


Wednesday, June 27, 2012

Cupcakes in a Jar

Ok, so I admit freely these were not my idea. I first came across the concept on Pinterest and then found the source of this great idea on a blog I follow.

Cupcakes in a Jar

When I saw these, though...I knew I could have some fun. Easy to transport and fabulous looking? I had to give these a go! Even though the 4th of July is just, well, the 4th day in July here, the colors are the same as the Dutch flag, the EK Football championships were coming up (sadly, short-lived for the Dutch team this year) and I had an ''American Party" (what most Americans would call a Potluck) coming up for parent council I am on at Little Man's School...these fit the bill perfectly!

If you want to give recreating these a try yourself, here's my shopping list (and sources):

Click Here for a Printable Version
· Gel food colors - Red (no taste) and Royal Blue. I buy the Wilton gel colors.
· Icing / buttercream whitener - real buttercream is an ivory/soft yellow so to get it really white, you'll need to color it.
· I really recommend using baker's powder sugar and buttercream mix to get a smooth and tasty buttercream that you can color, swirl and pipe in a bag. This base recipe also gives a rich and creamy base flavor. If you like, you can flavor the buttercream any number of ways, but I left it as is for this creation.
· White Cake (either make or use a box mix) - the key is with this type of cake that you only use egg whites - the yolks will color the cake. I used a box mix as these were time intensive enough with the coloring. A box mix will yield 24 cupcakes, but with the coloring I got 22 cupcakes out of my batch in total.
· Plain cupcake wrappers - no need to get fancy here - leftovers (unused of course) work fine since you un-wrap them and cut them once cooled. If you had silicone muffin pans or wrappers, this would be a good project to use them for since you don't need the paper wrappers for transport and presentation once your cupcakes are cooled
· Glass jars with lids - I bought these 250ml jars at a glass wholesaler - depending on how many you want to make I guess you could save up pesto or baby food jars - but I didn't have enough time to eat that much pesto (and no more baby) plus deal with the removal of labels, glue, etc. In the US, they use canning jars - which if I could get my hands on here, I would use, too. As it was, this is as close as I could come. You can still fit 3 layers (1 1/2 cupcakes per jar) to get the effect, which is what mattered most to me, but the mouth of the ''Dutch'' jars are a bit smaller than the rest of the jar, so you need to do some careful fitting of the cupcake at each layer which I will describe below.
· Ribbon - If you had some laying around, use whatever. I did order some red, white and blue stripe ribbon because I didn't have any in the house and the dutch flag stripe just kind of completed the look I had in mind.
· Optional - spoons. Since I was taking these to a potluck, I wanted them to be ready to eat with no additional flatware or service needed from the hostess. I found these blue ones in the Xenos, 8 to a pack for a (1) euro. They even had the little hole in the end ready for threading with ribbon. Score!
· Also optional, as a finishing touch, you can add sprinkles to the top. I found red, white and blue sprinkles that were perfect for this.

Ok, now that you have everything - here's how make and assemble the ''cupcakes in a jar'':

3 layers of cake (red, white and blue)  and a chocolate option (in back)

First, make your buttercream. If you make it as outlined above, you'll need at least 2 hours prep and setting time, so if possible make this in advance or start with this so the setting up time is happening in parallel to the other steps....


1) Make your white cake mix according to your recipe or box directions.
2) from the completed mixture, first scoop your white cupcakes ( I use a small ice cream scoop) to fill the cupcake tins 2/3 full. I did 8 white cupcakes.
3) Scoop out 8 heaping scoops into a separate bowl. Now you only used two bowls for the three colors.
4) One bowl you will color blue, one bowl red. Normally, with the highly concentrated gel colors, a little goes a long way, but having said that - don't go the toothpick (cocktailprikker) route to add color to the cake batter - use the tip of a tiny teaspoon to get a good size drop at the end of the spoon. You'll need less blue coloring than red - but if you use less red, you’ll get pink (or worse, road kill color) instead of a Valentine’s day red. Since you need a good amount of color, that's why I recommend the ''no taste'' option in the shopping list.
5) Once each bowl of color is mixed, scoop into the muffin pans \ liners. I ''only'' got 7 each per color, brining my total batch count to 22 instead of the box guidance of 24. I can live with that.
6) if you have a large enough oven, bake both trays at once - I do 150 degrees for 17 -18 minutes, turning the trays once during baking.
7) check for doneness - with the colors it can be had to tell, and you don't really want the tops to go ''golden'' - so now you can use the toothpick or cocktailprikker to check. Insert into the middle of a cupcake in the middle of the pan. If the cake doesn't stick to the wood, they are done.
8) Cool the cupcakes on the counter in the pans for 1 minute - not longer.
9) Remove the cakes from the pan and place on a wire rack to cool completely. (at least 1 hour).
10) Cover and store (but do not refrigerate) for 1-2 days max. If you are making these ahead, after they have cooled completely, layer them in an airtight container, with bakpapier or parchment paper between the layers, add a layer of clingfilm before putting the lid on and store in the freezer for up to 3 weeks. The day of assembly, let the cakes come up to room temperature (at least 1 hour) before going to the next step - Assembly.

Now, to assemble the cakes -

11) Cut each cupcake in half horizontally
12) Fill 2 piping bags - 1 with white butter cream, 1 with 2 stripes each of red and blue striped butter cream (for tips how to stripe buttercream in the piping bag, see this great tutorial blog post)
13) Take a 1/2 blue cupcake and carefully fit it into the jar. If you use the bottom half, this will go easier - the tops can be more likely to crumble, so I fit the top halves top up rather than tops down - and guide it to the bottom. If there are crumbs stuck to the inside, take a paper towel and wipe the sides clean before proceeding.
14) Pipe a layer of white buttercream (I made a full circle on the outer edge and a bit in the middle so that there was not too much cream to cake. it's nice to see the ring of white and keeps it from looking like there are gaps in between the layers.)
15) Repeat steps 13 and 14 with white cake
16) Repeat step 13 with the red cupcake

I prefer to repeat 13-16 for the number of cupcakes I want/ need to make, creating all the jars, and then do the final piping in one go. If you want to finish each jar individually, go directly to step 17 and repeat :-)

17) Take the piping bag with the blue and red stripes and pipe a swirl (using a 1M tip) on the top of the cupcake. I pipe from outside towards the center, in a counter clockwise motion.
18) Top with red, white and blue sprinkles. (If you have a little helper in the house, this is a perfect job for them!
19) Seal the jars with the lids. The sprinkles will start to ''bleed'' color into the buttercream, so I would not do assembly more than the night before (max 24 hours in advance). I stored the assembled jars in the pantry where it is much cooler than the rest of the house. Refrigeration will change the texture of the buttercream once piped and increase the bleed - so avoid refrigerating decorated cupcakes whenever possible as a general rule.
20) Finally - take a length of ribbon, add a spoon and tie around the jar. I used a sticky dot to keep the ribbon in place while tying and to make sure the ribbon didn't slide off during storage and transport.

Top View (with sprinkles on top, of course!)

Display, serve, enjoy - I can say without ego these were a hit. I had a great time making them, and they bought smiles to the faces just about everyone. These (and all the possible iterations and variations) will go in the ''remake'' pile for sure!


Monday, June 25, 2012

Football (soccer ball) cupcakes

What do you make for a (almost) 7 year old boy who is soccer (football) crazy?

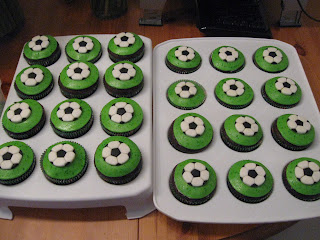
Soccer ball (football) cupcakes, of course.
I googled and searched (but had not yet discovered pinterest) but couldn't find anything that looked real. Everything pre-made was either cutsey or a bit abstract or the homemade ones were made with frosting and edible markers. I wanted to make fondant footballs...this  *must* be possible?!
After searches and blog posts and a clear idea of what I did NOT want the end result to be, I finally cobbled together the tools and created my own step by step method. I loved the end result, but these are not quick. Easy - yes....but detailed.

ready to bring to school!
I made these for both his class, the after school care and his football team. All told, about 45 cupcakes. I loved the end result, but I've got to be honest - these were time intensive. I did a lot of the pre assembly steps in the 2-3 weeks before the parties or it would have been impossible for me to do it all in one setting.

If you want to recreate these little masterpieces - pictures don't do these justice - you'll need the following:

Click here for a printable version
  • Cake mix  - made or purchased - we did vanilla and chocolate swirled cupcakes using devils food and yellow cake mix, which you can buy here - two boxes make approx 48 cupcakes.
  • Pre colored fondant in 3 colors - leaf green, black and white. If you want to color your own or make homemade fondant - you'll need to use gel colors to do so, and black is one of the hardest colors to get black - usually it comes out more grey. I used 250 grams pre colored bricks of the black and green and more (closer to 500 grams) of the white. I'll explain why more white is needed later.
  • Pentagon and Hexagon (5 and 6 sided) cut-outs to make the soccer balls. Using this kit you can also make 3D soccer balls -  but I wanted the flat circles for this project.
  • cookie or fondant cutters to cut out the balls - I used the same size for the green and white to make rounds, then when I had the ball all assembled,  a slightly smaller size (the middle of the 3 fondant cutters) to cut out the final soccer balls.
  • cupcake wrappers - I used green football themed ones
  • edible glitter or pearl dust in leaf green to make the ''grass'' look real.
  • Silicone mat and rolling pin (also covered in silicone) - you can pick these up anywhere. I don't have a name brand of either tool and they work just fine

Then, depending on how much time you have, and how far out you plan, follow these steps:

1) bake the cupcakes as per the cake directions in the liners. I made these ahead, cooled them completely and then stacked them in an airtight container with parchment paper between the layers and put them in the freezer. Do this the day you make them, but only after they are completely cooled. take them out the day of assembly. they only need about 1 hour to come back to room temp.

While the cupcakes are cooling (or on another day all together) begin the assembly of the soccer balls. You will need the 5 and 6 sided cutters, a sharp knife or fondant tool and 2 different sizes of round cutter, together with the white and black fondant. I used a circle round cutter the size of the cupcake tops for both the green grass and the white fondant ''bases''.

2) Roll out a fairly thin (but still possible to pick up without splitting or tearing) layer of white fondant. Make with your cupcake-top sized cutter anywhere from 6 to 8 circle bases at a time.

The base circles

3) Roll out a thicker layer of white fondant and use the 6 sided (hexagon) shaped cutter. Do not press so hard that the fondant sticks and comes up with the tool, but hard enough that you have a clear imprint and the edges will separate from the sheet easily. For each completed soccer ball, I needed 5 white shapes. I liked to make the cut outs in batches of 6-8 per session, so you would need to punch out between 30 and 40 per time. Using your knife or fondant tool, clean up the edges as you separate the shapes from the sheet. I also used the knife at this point to make sure all the cut outs would lift off the mat so the shapes stay intact. Move the completed cut outs to one side or store in airtight container while you work with the black fondant.


the hexagon cutter cuts 2 at a time, you'll need to cut them apart
end result


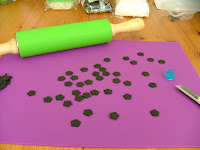
4) Roll the black fondant to a similar thickness. Using the 5 sided (pentagon) cut out, you will need to repeat the directions above. For each completed soccer ball, you will need 6 pentagon shapes. so for a batch of 6-8, make between 36 and 48 pentagons.
5 sided tool cut outs in black (6 per ball)
The final cut outs


Now, using a small paint or decorating brush and a small cup or bowl of water, it's time to assemble the soccer balls:
5) taking one of the white rounds, lay it int he center of your mat.
6) pick up a black cut out, use the water and brush to ''glue'' the back and and place it slightly off center on the white fondant base.
The first glued pentagon
7) now take a white cut out and align it against one side of the black cut out, using your knife's blunt edge or fondant tool to define the space between the white and black as well as smooth the outside edge. repeat until all five white edges are aligned to a side of the center black pentagon.
completed white round

8) now take a black cut out and using your brush and water as glue,  fit it in between the white cut outs, building the next layer outwards. Again, define the edges between the black and whites shapes, while smoothing and using the outside to ''push'' the black to completely fill the spaces between the whites.
the final black round

When you have all the shapes on the base, let sit for 1-2 mins before using the fondant cutter for your final football.

9) using the middle size of the fondant cutter rounds, cut out your final football shape. The rounds you can store in an airtight container for at least 2 weeks. I stored them in the pantry, out of direct sunlight and temperature swings. Use parchment paper between layers, and because I did not want these to harden, I also used a layer of clingfilm before putting the lid on.
position the cutter and....voila!

Once all your footballs (soccer balls) are made, you can start on the 'grass'.
10) Using the cookie cutter that was used for the white bases, make your cupcake sized round cut outs from the rolled green fondant. you want it to be about the same thickness as the other cut outs (minus the base). Some kids eat the fondant (mine loves it) and some ate the footballs and peeled the grass off. either way, you don't want it to be too thick to eat or so think it won't peel off if so desired.

11) Using the paint or decorating brush from the ''glue'' step, stir the pearl dust in a small amount of liquid - I used lemon extract - and then brush the rounds with the pearl dust mixture. the pearl dust needs at least an hour to dry and set on the fondant before you try to store them or stack them in any way.
12) using a bit of butter cream or frosting, spread a layer on the cupcakes
13) place the green grass layer on the top of the cupcakes and ''mold'' the round if necessary around the edges of the cupcake
14) finally, using a dot of butter cream or frosting, adhere the the footballs to the grass. I centered them and then lightly shaped them to fit the contours of the cake.
Completed cupcake

15) repeat steps 12 -14 until all cupcakes are finished.

Top view
For his Birthday party, we carried the football (soccer) theme through and had a football pull pinata, football theme scavenger hunt - activity, and because mom was all cupcaked out, we got out the chocolate fountain for some interactive fun and sweet treat. You can see the soccer (football theme party here on Kevin's blog.

Enjoy - and let me know if you attempt these!

Thursday, May 10, 2012

Mini No Bake Cheesecakes

I love to make cheesecake - It was one of the things I really missed when I first moved here 15 years ago. For the Super Bowl this year, I gave a try to an idea I had knocking around about how I could use a no bake cheesecake mix and make something wonderful that wouldn't take hours of prep time and could be eaten at halftime on the couch -(2am locally) on a Monday morning.

In the last few years, a lot of places sell cheesecake, a couple even call it New York cheesecake...but rarely it is what I call cheesecake. for me there are two types of cheesecake to have in your repertoire:

1) no bake cheesecakes - either from scratch, or if I am going to use it as a basis for my own toppings or creations, I find that Jello makes a good no bake cheese cake. Mon Chou or "Kwarktaart" is NOT the same! :-)

2) A good baked cheesecake. My favourite variation of this has got to be Pumpkin Cheesecake (that recipe is a whole separate post) but it's time intensive, and you need to be able to cook the cheesecake in a water/steam bath to prevent cracking. And please, only use Philadelphia or cream cheese - nothing else matches the taste and texture!  Follow these tips for a perfect baked cheesecake:

For the crust, I either buy graham crackers from places that sell American food items and make the crust myself if I'm going completely homemade, or I use a ready made crust (usually Keebler) that you can find on www.usfoodz.nl

To make the cheesecakes in the photo below: I used the following:


No Bake Cheesecake:
  • 1 pkg. Jello no bake cheesecake mix
  • 2 tbsp. sugar (fijnesuiker)
  • 1/3 cup (80 grams) butter, melted
  • 1 1/2  (350 ml) c. cold milk
Sauce
  • 1 package (150 grams) fresh raspberries
  • 1/2 cup (100 grams) sugar
  • 1/2 cup (120 ml) water
Decorations
  • 100 grams white chocolate, suitable for melting
  • 6-10 large fresh raspberries selected from the package above
  • 1-2 tsp Sunflower oil

First, I got out the cupcake liners and put those in my muffin pan. Then, I put a spoonful of the crust mixture into the liners and used my smallest measuring cup to press the mixture down into a even layer to form the base.

By doing this in the muffin pans, the liners don't ''stretch'' - and since you don't bake these cheesecakes, you need the liners to stay as stiff as possible.

Next, I followed the direction for making the filling - using the enclosed mix together with the cold milk - you'll need a hand/electric mixer for this step.

Then, I spooned the filling over the crust into the muffin liners and placed in the fridge for 2 hours. You want these to be firm before you top them with the raspberries.

Creativity 101
Now, we were in recipe no-mans land.....I had a vague idea how I wanted to make the raspberry sauce based on a how I make homemade cranberry sauce (compote) every year, and white chocolate covered raspberries cut in half to show red and white layers seemed like they would be the perfect finishing touch. With that idea as my basis, I did the following:

  • Equal amounts (in measuring cup terms) sugar and water dissolved together and bring it to a boil.
  • At the boil, add the fresh raspberries and boil together, stirring regularly for about 10 minutes.
  • Remove from heat and allow to cool approx 30 mins. Sauce will be warm and not yet too thick to sieve. 
  • Before the sauce cools completely, run it through a sieve to take out most of the seeds.
  • The pulp that was left over, I then used about half to spoon back into the mixture - too many seeds do not make for a pleasant experience, but you need some of the seeds and jam-like thickness of the cooked fruit to make the sauce thick enough.
  • The sauce/jam will thicken as it cools - you can do this for about 2 hours to come to room temperature or about 1 hour in the fridge.

While the sauce and the cakes were cooling in the fridge, I set about making the chocolate covered raspberries. I held back 10 of the nicest shaped raspberries to use for the dipping.

  • You can melt chocolate on the stove in a double boiler method or in the microwave. I used the double boiler (au bain marie) method, melting the chocolate in a glass bowl over a put of (just) boiling water.
  • To get the shine and consistency I wanted, I added between 1-2 teaspoons of oil as the chocolate melted, until it coated the back of a spoon smoothly when dipped.
  • Then, I dropped the raspberries one at a time into the chocolate, gave them a good coating before picking them out of the mixture with a fork and placing them on a cookie sheet lined with parchment or bakpapier.
  • Once all the raspberries were done, I set the timer for 15 mins and then redipped them, following the same process. Once the second dip was done, I set them in the fridge to harden completely

Assembly:
Taking the completed mini cakes out of the muffin tins, I then put a generous teaspoon of sauce on each cake.

Once the raspberries were set, I took a sharp knife (like a potato knife) and cut each raspberry in half.

I needed 12 halves (6 whole) but made 10 just in case. The whole leftover berries I offered as "bonbons" to the hostess - they were very well received that way as well!

For transport, I used a cupcake carrier and left them in the fridge until about 1 hour before serving time.

They peeled away from the cupcake liners easily, held firm and were not too cold to eat, so all the flavors came through!

Enjoy!


Tuesday, May 8, 2012

Carrot Cake cupcakes - the works!

It's funny how things creep.....I've been dong a lot of baking the last 6-8 months, and at some point wanted to share what I'd been doing. I'm not a big recipe person, but I like taking photos of the completed projects and sharing them on Facebook - then a month or so go, I got into Pinterest , and love being able to ''pin'' the things I've had fun creating or the things I'm filing away to try next time the cooking/baking bug bites

But, with Pinterest...it really helps to have a recipe behind the pin. With things I find, no problem...the things I make/create and hodgepodge from various sources and through trial and error...not so much. Hence, a blog is born. Here is how I make things I make.I'm not a pro, I don't have endless time to devote to my hobbies, and I don't remember to take pictures at each step. But, for better or worse, I will lift the curtain, show off my cheats and share with you my 15 years of trying to make American style goodies while living abroad.

For Thanksgiving last year, I wanted to dust off an old favourite - Carrot Cake (worteltaart).

I always feel a bit guilty to admit this - but I use a mix of well, pre-made mixes and my own touches.

Homemade completely from scratch is always best when you have all the time to do so (and in the long run is usually cheaper per serving) but sometimes I have to find the middle ground between what I want to do and what I actually have time to do in the mere 24 hours we're allotted per day....

Here then, is the recipe as I made it in the photo below - and I'll list the ''from scratch'' option if you prefer that way.


The cake

For this recipe, I started with Betty Crocker Carrot Cake mix. In the Netherlands, I find the best selection of cake mixes on www.usfoodz.com. If you have to go outside of NL, I also order from the UK http://www.usafoodstore.co.uk. Both option are still cheaper than ordering from the US (unless my mom is sending a ''care'' package).

Besides the pre-done cake mix, you'll need the following to make approx 24 cupcakes:
  • 1 box Betty Crocker® SuperMoist® carrot cake mix
  • 1/2 cup (approx 120 ml) vegetable oil
  • 1 cup of water (approx 335 ml)
  • 3 eggs (M or L)
  • a generous dash (1/4 teaspoon) of cinnamon (kaneel) - optional
Now, I'll leave the debate of box mix vs scratch off the table for now - BUT, whether you use a box mix or your own, what takes this cake from good to YUM is the add ins.....

I recommend combinations and variations of the following:

  • 1/2 cup (75 grams) chopped nuts - I like pecans, but walnuts are less expensive and work equally well
  • 1/2 cup (75 grams) dried cranberries (or raisins). I highly recommend the cranberry and pecan combo
  • 1/2 cup (75 grams) white chocolate chips (bakvaste) that will not melt in the oven - I buy mine here

For the box mix, the baking instructions are:

  • Heat oven to 350°F / 175°C
  • In large bowl, beat cake mix, oil, water and eggs on low speed 30 seconds. Beat on medium speed 2 minutes.
  • Stir in the added ingredients , one at a time, and mix gently (silicone spatula or the like works well).
  • Pour into baking cups in cupcake pan, filling each about 2/3 full. I find the metal ice cream scoops the supermarket sells works quite well as a single scoop. Do not overfill, and tap on a flat surface to eliminate the largest air pockets before putting in the middle to lower half of the oven.
  • Bake 17-22 minutes, turn the tray once during baking. Remove to wire rack within 1-2 minutes, then cool completely before frosting. If you leave the cupcakes in the pan too long to cool, you run the risk of the cupcake liners pulling away from the cupcakes - I think it's due to the steam having no place to go. Even with the add in's this is a pretty moist cake - which is one of the things I love about it!

If you want to make the mix from scratch, the ''add ins'' stay the same, but you can find an excellent recipe (in dutch) from the Albert Hein website:

Ok, now for the frosting:

I admit, I usually have a can of frosting (from Betty Crocker or Duncan Hines) knocking around in my pantry, but for cream cheese frosting, I usually do make my own. For these cupcakes, I used the box mix and homemade frosting - go figure!'

The main ingredients are cream cheese (roomkaas) - I like to use Philadelphia (which is available pretty much everywhere now) , powdered sugar and butter: to scale this recipe for more or less cupcakes, I use the rule of halves - however much Philadelphia you use, you use approx 1/2 that amount of butter and half again the amount of powdered sugar.

  • 450 grams Philadelphia (2,5 packages as they are sold here)
  • 225 grams (unsalted)butter at room temperature
  • 125 grams powder sugar
  • 1,5 teaspoon vanilla extract (essence)

Mix the butter, Philadelphia and vanilla together on medium speed until you have a creamy consistency. Then, add in the powdered sugar bit by bit until everything is mixed completely.

You can spread the frosting on with a knife or use a piping bag ( I used a star shape tip to get the swirls)

If you want to buy your frosting, you can get it at the same places as the cake mix above but store bought frosting is sweet (and, yes, I say that as an American!)

Finishing touches:

I did use pre-made vanilla frosting for the decorations because I needed to color and pipe it - as it was decoration I wasn't too concerned about the taste as I'd made my cream cheese frosting. You could make extra cream cheese frosting, or use a standard buttercream recipe for the piping decorations.

Using Wilton Icing Gel, I colored one batch orange and one green for my carrots and and tops. Using two small round tips, I made a triangle shaped zig zag with orange, then added a line with three angled lines coming away from the baseline as the green top. I had enough dried cranberries left over that I placed one on top of each cupcake as additional decoration.

Start to finish - about 3 hours. The cupcakes must be completely cool or the frosting will slide right off!